Showing posts with label Tips and Tricks. Show all posts

Monday, April 18, 2011

Tips and Tricks

Happy Monday everyone! Jen (redutedaisy) here to bring you my very first blog post! Wahoo! I don't know about you, but I love learning new things and getting tips that make scrapping even better. Today, I'm going to share a little tip I learned a few months ago. Sometimes when I scrap, I know the exact direction that I want to go. But other times, I have a complete mental block. I'll sit and stare at my page, full of papers, elements, pictures, and journaling and have no idea how I want it to all flow together. Which is why templates are so fantastic. But, there are times that I want to feel like I "did it myself" (much like a toddler, I know!).

So what to do when you don't want to use a template but don't know where to begin? Many people like browsing through galleries to try and find their mojo again. It's a great way to get inspiration, and you may find a layout you love so much, you want to do something with it yourself. There are so many great pages out there, and my problem was trying to remember how they looked. Sometimes, I'd sketch layouts in my sketchbook. Other times, if I was able, I'd copy and paste it into a word document, print it, cut the layouts out, and then glue them in my sketchbook. It was time consuming sometimes, but I absolutely did not want to forget some of the amazing layouts I'd find.

A few months ago, I found a great website that saves all that trouble! Have you heard of it? It's called Vi.sualize.Us. It's a social bookmarking website that allows you to actually save pictures you find onto your account so you never forget them! This is how it works-you go the their site, create an account, and then download their toolbar and install it. The next time you come along a layout that you love, you right click your mouse, as if you were going to "save as", but there will an extra option called "remember on vi.sualize.us". You choose that option, a box will come up allowing you to change the name and add any other details, and then click "post"! It saves it to your account. It's brilliant!

I just did a layout over the weekend using Christy's beautiful kit, "Everything Spring", a part of her grab bag at 9th and Bloom, and put Vi.sualize.Us to good use. I kind of new the direction I wanted to go (I wanted to do a layout for the Vintage Corner challenge at 9th and Bloom), but it was taking me too much time trying to figure out how to fit all the pieces of my layout together. So, I logged into my account, and found this layout by Armi Custodio:


Honestly, this layout spoke to me! Sometimes when I scraplift, I only do a part of it, but I loved this one so much I pretty much used it all. Here's my layout:

I really love this site and hope it will help some of you! Have a fabulous Monday!

Tuesday, November 16, 2010

Tips and Tricks Tuesday

Hi everyone! Kim here bringing you today's Tips and Tricks Tuesday!
I sometimes hear from fellow scrappers that they're finding it hard to scrap with patterned papers. I personally love patterned papers, my pages wouldn't feel complete without them! I cut strips from them or I use them as a mat for my page or I sometimes even use the entire patterned paper as a background. Today I wanted to share a tip on how you could use them differenty.
Instead of just cutting out strips or rectangles or circles from them, have you ever tried the custom shape tool in Photoshop? You could use any custom shape as a clipping mask for your papers!

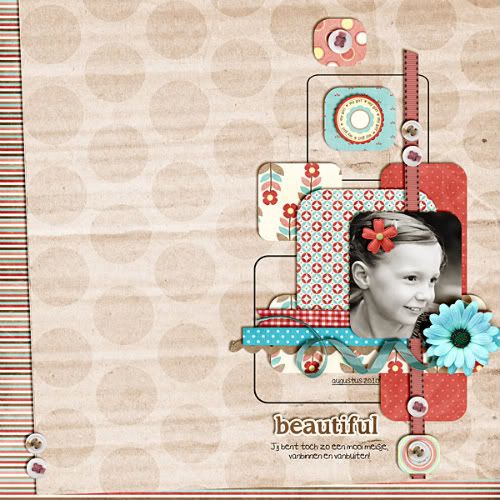
In the example below I used the rounded rectangle tool. You can find that tool in the dropdown menu of the rectangle tool. To draw a rounded rectangle, you need to set the radius of the rounded corners first. (in the top menu bar) In my example I set it to 30 points (type 30 pt). Then you make a new layer and drag with your tool to draw the rounded rectangle (hold shift to make a rounded square). Then, drag a patterned paper on top of that layer, right click and choose: make clipping mask. And that's it! Repeat with different patterns and arrange them in an appealing way. For the outlined rounded rectangles, I first drew my shape on a separate layer, then I selected the shape, made a new layer and made a stroke around my selection on the new layer (Edit/Stroke). Then I deleted the original shape layer.

You could also experiment with other custom shapes, Photoshop has plenty of them!
I hope this tip was useful to you!


This page was created using Sugar Pie by Christy Lyle.


And the kraft polka dot paper is from the Krafty Dotty paperpack.