Showing posts with label Hybrid Hotness. Show all posts

Wednesday, May 4, 2011

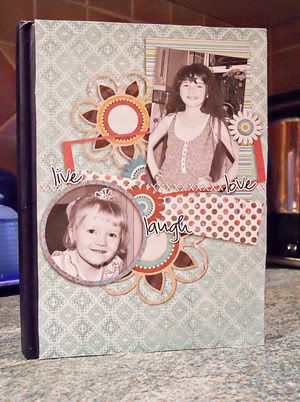
Hybrid Notebook

Hey Everybody!
My names Star and I recently joined Christy's team.
So I've recently become interested in hybrid and when my notebook for college ran out I decided to try my hand at making a hybrid notebook. I printed it out as a flattened image as its going to be used a lot and didn't want to risk extra elements falling off! and here it is...
I love how it turned out and have gotten some lovely comments on it and a few people asking could I make them one lol

The products I used for this are...
Summer Brunch
You can grab it at 9th & Bloom HERE

Sticker Doodle Words Everyday
You can grab this at 9th & Bloom HERE

Hope you like it!


Wednesday, April 20, 2011

Hybrid Basket

Hi everybody! Tanyia here again with another fun hybrid product for you! This one I did for Easter ... however, keep in mind you can make little baskets like this for any occasion to hold any sort of seasonal decor!

In this instance I made this to go on my kitchen island and match the color scheme of my Easter Egg tree. I think the eggs looked really adorable!

Here is what I used, Christy's Bloom Fest grab bag! Take a look!


Any of Christy's kits would work great for a project like this, so keep your eye out for one that strikes your creative fancy and maybe matches the colors or a holiday you are decorating for! Here is my sweet little basket. Image linked for complete credit info.


Thanks for looking! I am so excited to come back next month and share some more awesome ideas with you! So, until next time...happy scrappin'!

-Tanyia

Hybrid Fun!

Hi everyone, my name is Tanyia! I am new to Christy's team, and so excited to be here and to be able to share with you one of my projects!

If you are interested in hybrid, Christy's products are so perfect for your projects! The print out beautifully, crystal clear, vibrant and are so fun!

My 9 yr old is a very very girlie girl! She still loves to dress up and make believe, so of course every little princess needs a crown! I made this super cute and fun crown using "A Brand New Day" which is so fantastic and had just the perfect soft pattern and flowers! I used the alpha that comes with the kit for the word, "princess" and then I added some of Christy's "Sticker Doodle Alpha" for the bottom tag line, "of quite a lot"

Here is the kit I used (image linked):


and the extra alpha I added in (also linked):


And here is my precious little Becca Bear ... ummm, I mean Rebecca, sheesh don't tell her I said that! I did print this one out completely flattened, I just upped the shadows for realism, and I did print out 3 extra flowers, cut them and popped them on with a glue dot to give a little bit of dimension to it.

*image linked for full credit*
So super cute right?! I love how it turned out, and a week later and she is still playing with it! hehe.


That is all for today, but I will be back next week with another hybrid goodie to share with you!
Until then ... Happy Scrappin'!       -Tanyia

Tuesday, November 16, 2010

Hybrid--Matchbook Mini-Notebook

Happy Wednesday!!! Yay, we're half way through the week. Amanda here, and I'm so thrilled to be bringing you another round of hybrid fun with Christy's amazing designs.

Today I've got a matchbook mini-notepad, perfect for jotting down those things you need to remember. I've got this one all dolled up & looking Christmas-y, perfect for putting all those things your kidlets run around saying they want for Christmas.
Can you tell that I've got a mini-child in my house, who thinks they 'need' any & all toys they see advertised on TV?!

I'm working in PSE 5, but it shouldn't matter, which program you're working in because that part is super, super simple.

I started out with a blank canvas, that was 2.5 inches wide & 6 inches long. Then I put in a little brain work & decided that my matchbook would be about 2.5 inches tall when it was done. I created my layout by placing some guidelines at 3/4", 1 " & 3.5" . This separated my book into the sections I would need to design, this is going to be the cover for our little note pad.

**Note that the top section is going to flip up, so you'll need to design it upside down.

Added some papers & embellies & wah-lah, beautiful!! You can fit more than one of these on a sheet, but I've only done one for today.


Print it out on card-stock (I just used, regular ol' white card-stock). Cut out & fold up, where you had the guides in your designing program & we're almost done.


Take a blank sheet of paper, maybe 2 or three depending on how thick you want your notepad & cut it into squares that are small enough to fit in the book, about 2.25". You'll need to score the cover in four places before inserting the papers. Score the cover at .75", 1", 3.25" & 3.5 ", I don't have a fancy scoring tool, so I use the back of a tiny pair of scissors, cutting mat & ruler.


Stack them neatly, place them inside the match book, staple near the center.


Fold the little short side up over, secure it with a little glue, or if you want the rustic staple on the outside look, you can staple it, I didn't do either & just left it as is. Flip the top cover down, tuck in & there you have it, a super cute, little matchbook notepad for all your notes on the run.


Created using A Year in the Life: December . Get it here or purchase it with the entire Year in the Life Collection here.

Come back & link us up to your little matchbooks & we'll leave you some love!

~Amanda

Wednesday, November 3, 2010

Hybrid Hotness: Cards!

Happy Wednesday! Joana here to share a few of the hybrid cards I've made with Christy's fabulous kits. I am SO excited she's back in the digi-designing business!

Have you seen the wonderful kits from the A Year in the Life collection? I love these - they're great for 365 projects, calendars for yourself or for gifts for the grandparents, and also for hybrid projects such as cards!


I used A Year in the Life: May for this card.


This card was made with A Year in the Life: January. I love all of the purples and blues in this kit!


And finally, this card was made with Sugar Pie.


All of the stamps on my cards are from the Flowers2Share set by The {Stamps} of Life.